Linkedin prospecting & Emailing :
Lemlist automates a multitude of steps on Linkedin and in emails:
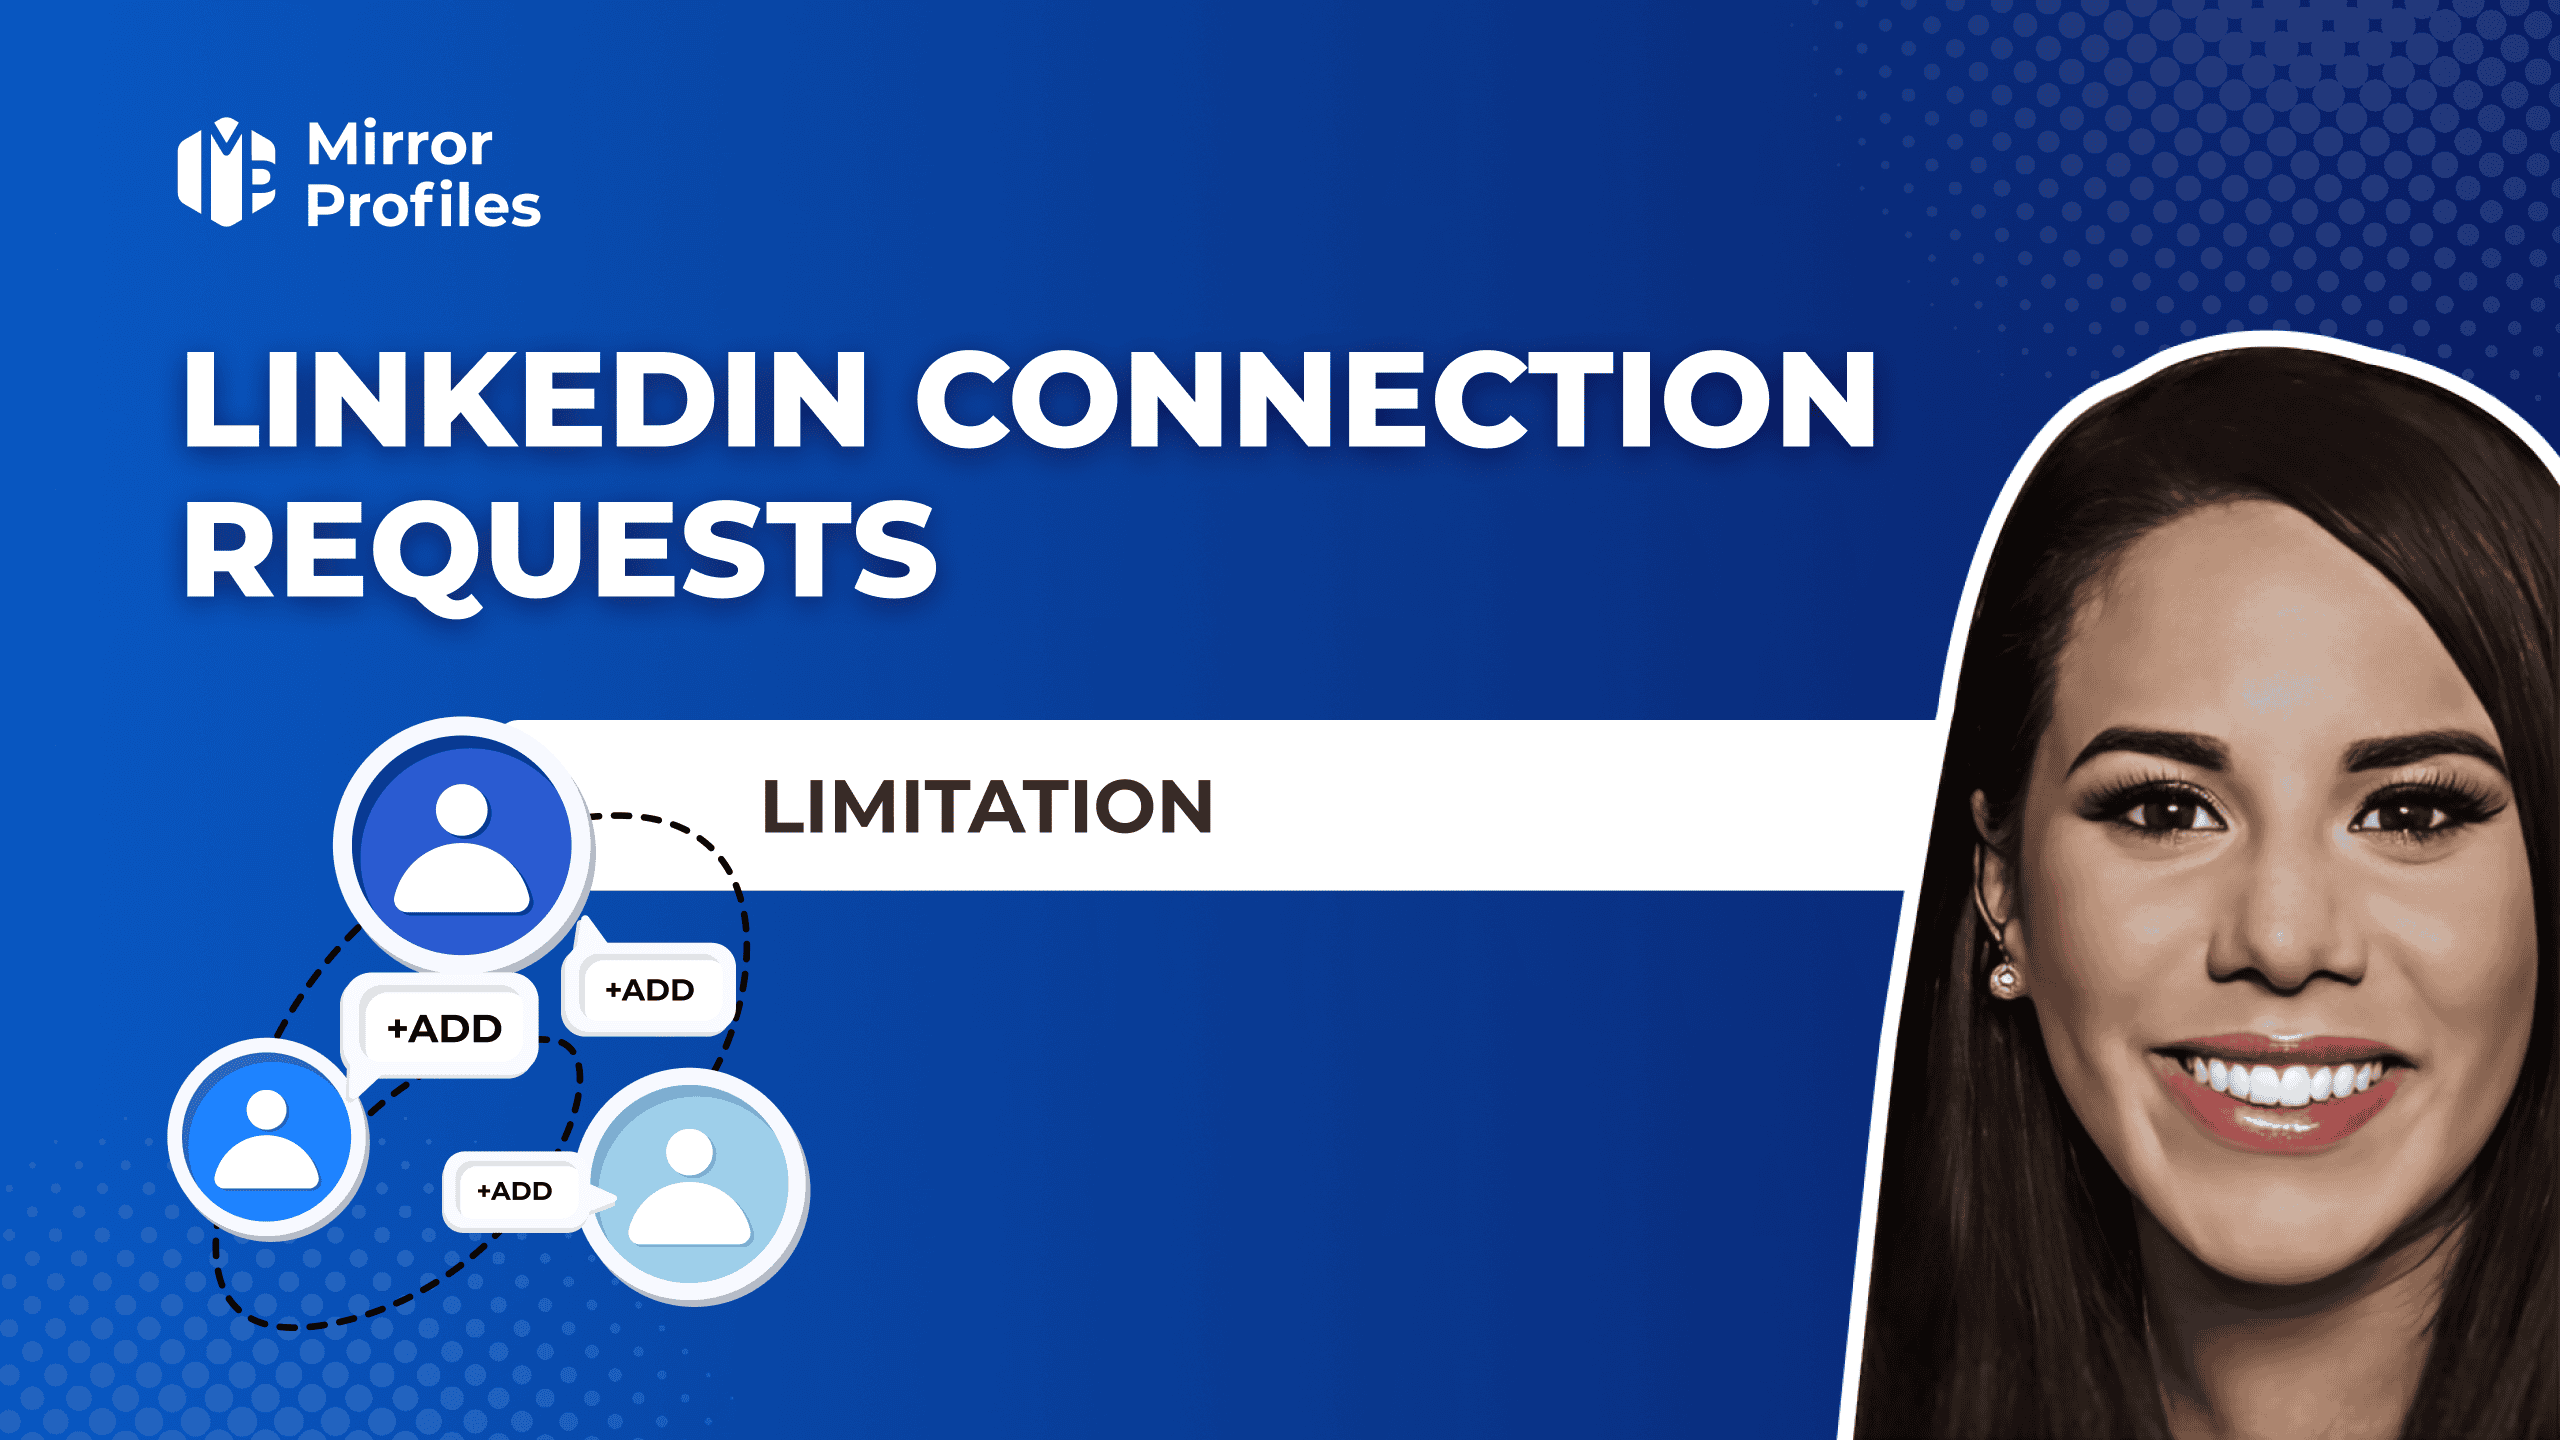
- Automatic Invitation Sending: You can send mass connection requests to targeted profiles, without manual intervention. Find out how to achieve an acceptance rate of over 50% in this article.
- Automated follow-up on Linkedin and/or by email: If a prospect doesn’t respond within a predefined timeframe, Lemlist takes care of sending a follow-up.
- Customizable workflows: You can create action sequences tailored to your needs. This is a considerable advantage, as most competitors offer pre-designed models. But we all know that personalization is the key to a successful campaign 😉
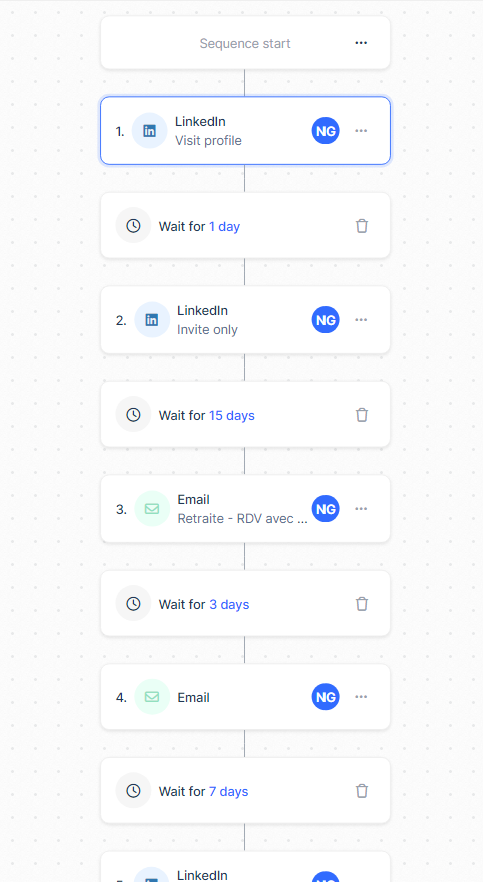
To illustrate, here’s a small example:
Prospect enrichment :
Lemlist particularly stands out in the field of lead enrichment. The platform offers three types of enrichment depending on the database you provide:
- Intelligent Enrichment: Simply provide the Linkedin URLs of your prospects, and Lemlist takes care of the rest: it finds the professional email and extracts the information from the Linkedin profile.
- Linkedin enrichment: Lemlist provides you with all the information available on a Linkedin profile, which is particularly useful for personalizing your messages.
- Email verification: If you import a database containing email addresses, remember to verify them with Lemlist before launching your campaigns. This will help you preserve the authority of your domain name and prevent your e-mails from ending up in spam.
Management and Tagging of Email Responses :
With Lemlist, you can manage all the replies received in all the mailboxes managed by the platform. The advantage is that you only have access to the responses to your Lemlist campaigns, and not to any other e-mails you may receive.
To better organize these responses and synchronize them with your CRM, you can assign two types of tags:
- Interested
- Not Interested
Tagging answers is crucial, and you’ll understand why as you continue reading this Lemlist tutorial.
The only drawback here is that Lemlist doesn’t yet centralize responses linked to actions on Linkedin. To benefit from the same functionality on Linkedin, you’ll need to turn to MirrorChat.
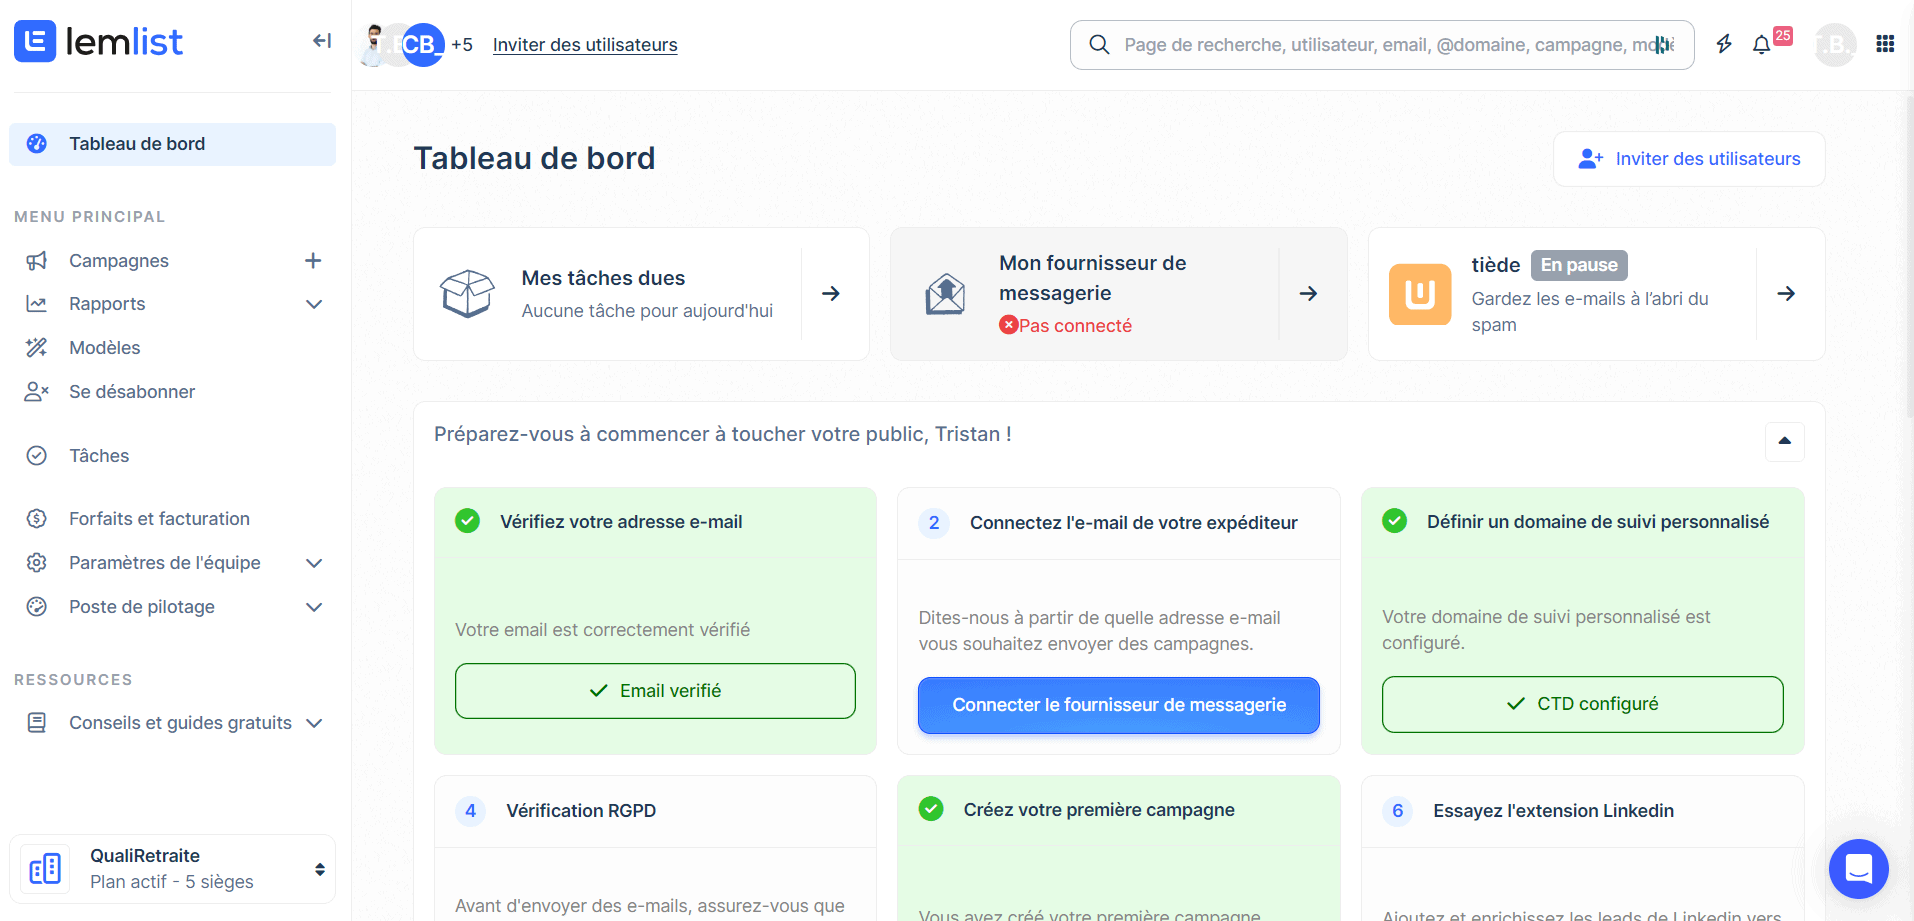
a) Lemlist Dashboard
Lemlist’s dashboard is designed to offer an intuitive and efficient user experience, enabling marketing professionals and sales teams to maximize their prospecting and communication potential.
1. Dashboard: This is the home screen where you get an overview of your account. Here you can see your to-dos, check the status of your email provider, and access resources to get your campaigns started.
2. Campaigns: This section is the heart of Lemlist, where you create, manage and track your email campaigns. You can personalize your campaigns, adjust parameters and analyze results to optimize your prospecting efforts.
3. Reports: Here you’ll find detailed analyses of your campaigns’ performance. Reports provide you with valuable statistics to evaluate the effectiveness of your Email/Linkedin campaigns and adjust your strategies accordingly.
4. Templates: This section lets you create and manage email and Linkedin message templates, making it easy to reuse content and ensure consistency in your communications.
6. Tasks: Stay organized and track your to-dos with this integrated tool, ensuring nothing is forgotten.
With Lemlist, you have all the tools you need at your fingertips to successfully carry out your prospecting campaigns and communicate effectively with your prospects and customers.
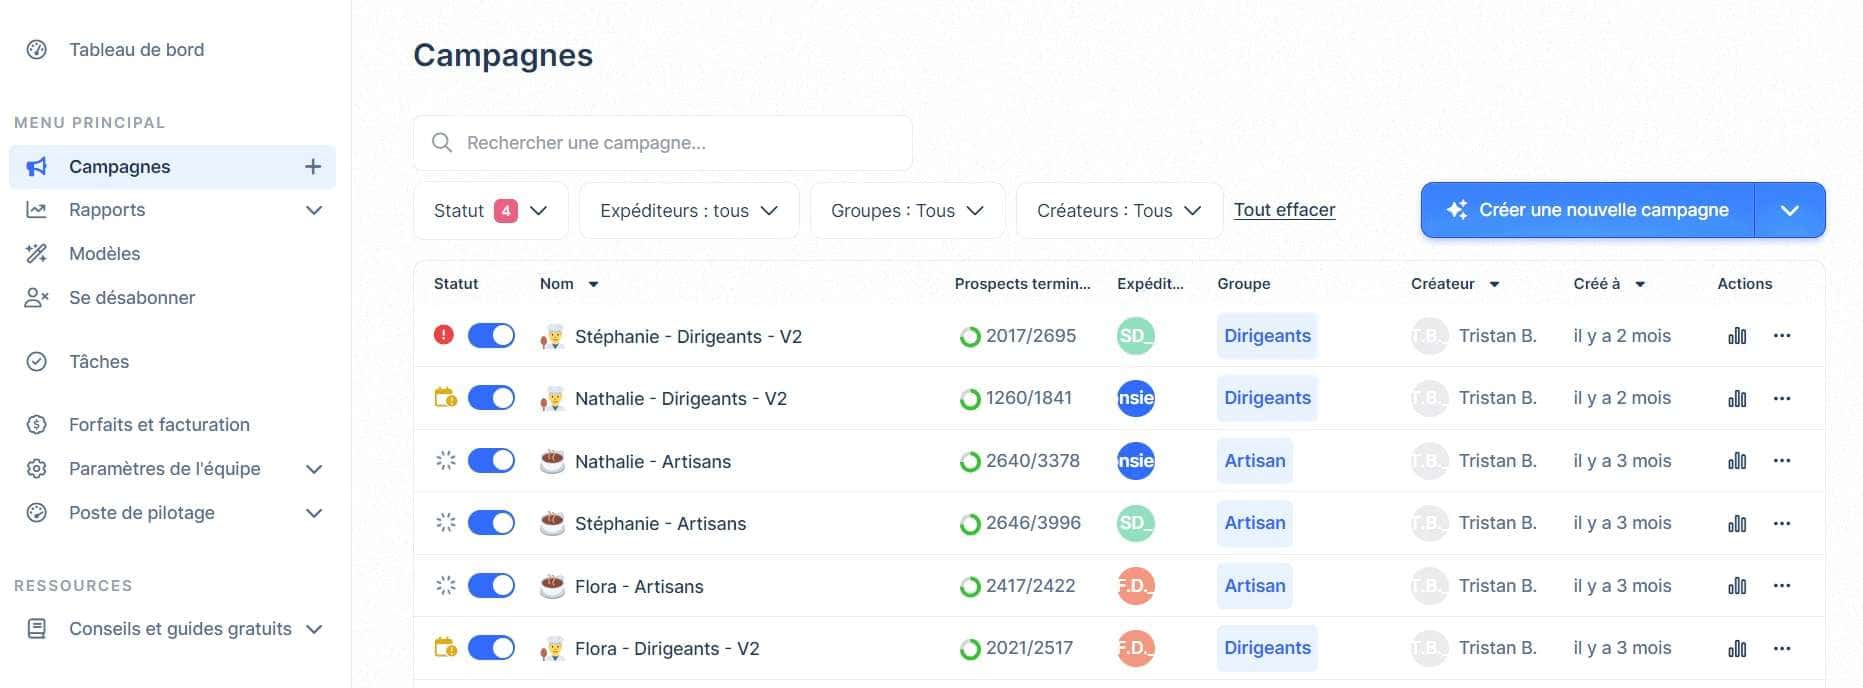
b) Campaigns
Lemlist’s “Campaigns” tab is the central space where you can manage and track all your prospecting and communication campaigns. Here are the different functions and information you can find:
Campaign Search: A search field lets you quickly find a specific campaign among all those you’ve created.
Filters and Status: You can filter campaigns by status, sender, group or creator to refine your view and better organize your work.
Campaign List: You have access to a complete list of all your campaigns, with key information displayed for each one:
- Campaign Name: The title of your campaign for quick identification.
- Completed leads: The number of prospects who have completed the campaign compared with the total.
- Sender: The person or entity in charge of sending emails.
- Group: The campaign’s target group.
- Creator: The person who created the campaign.
- Creation date: Indicates when the campaign was set up.
- Actions: Options for editing, viewing or deleting the campaign.
Statistics and tracking: each campaign is accompanied by icons and numbers that give you a quick overview of its status and performance.
Campaign management: You can manage your campaigns directly from this tab, performing actions such as pausing, starting or deleting campaigns.
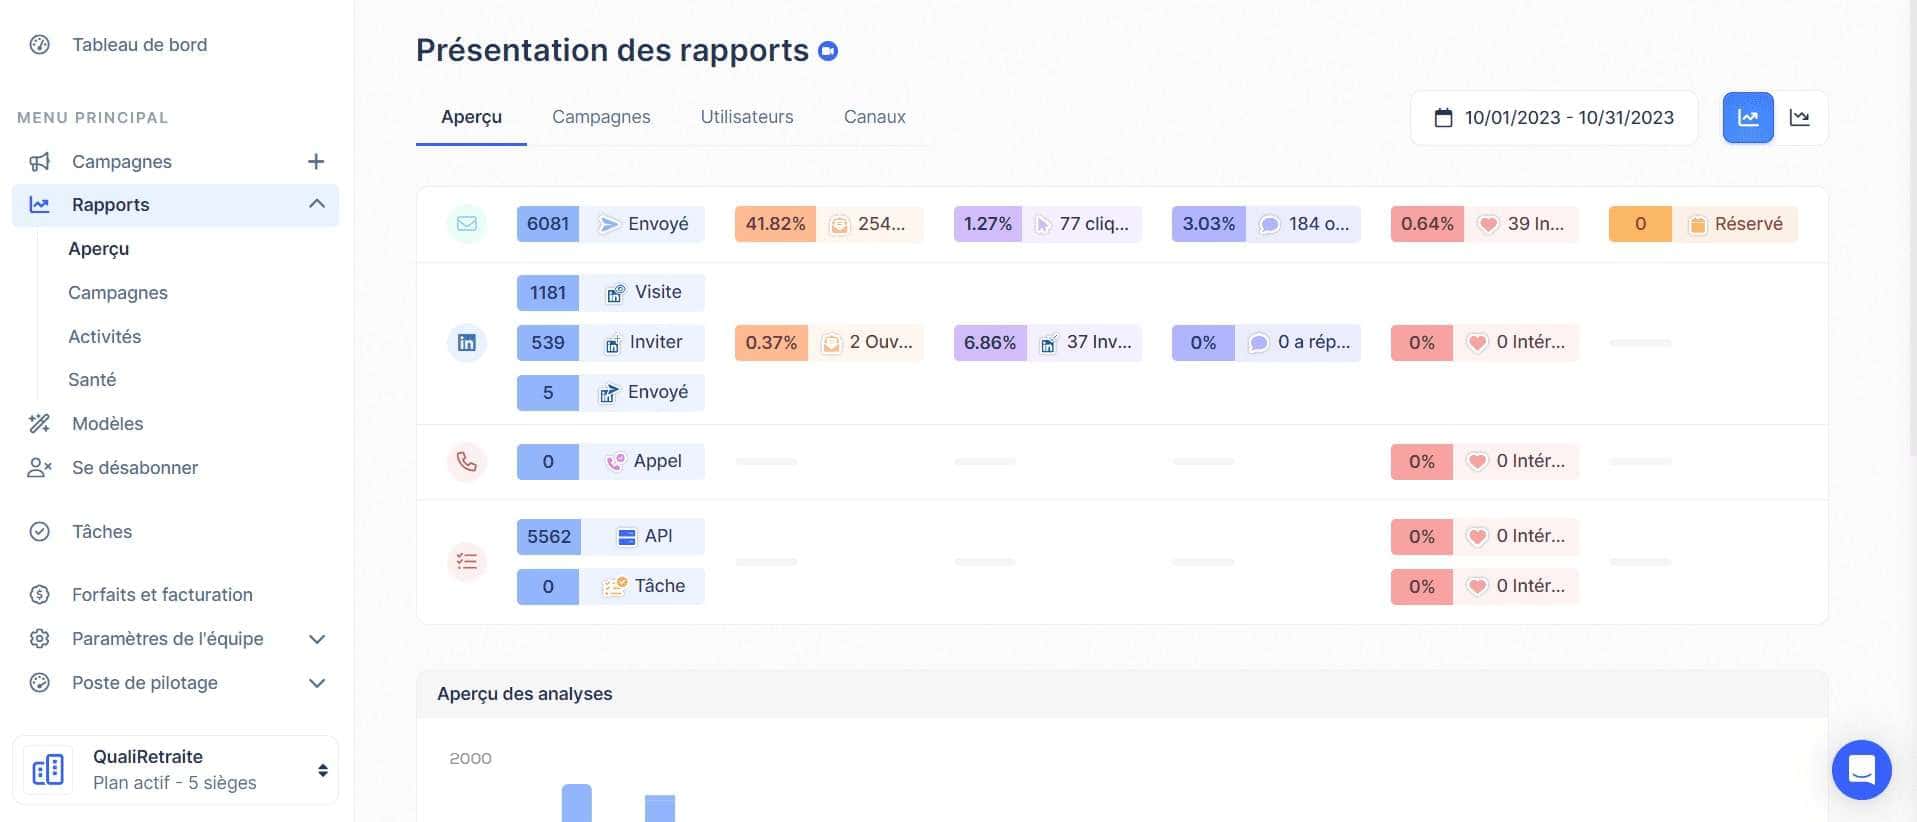
c) Deferrals
Lemlist’s “Reports” tab is designed to provide you with in-depth analysis and insights into the performance of your prospecting and communication campaigns. Here are the different sections and features you can find:
Reports overview: This section provides an overview of the various analyses and reports available to evaluate the performance of your campaigns.
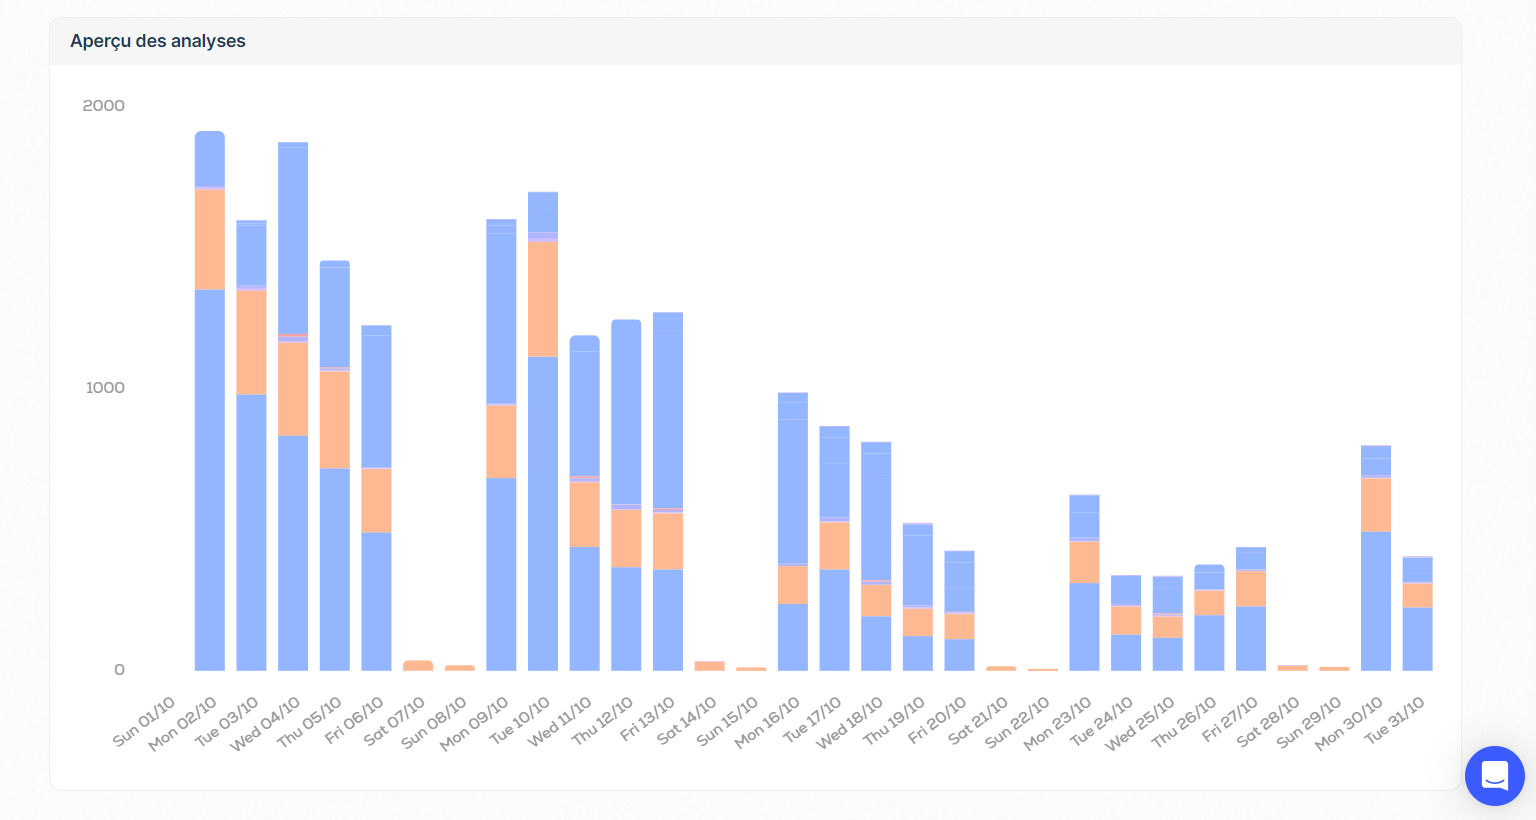
Overview: Here you get a visual summary and key statistics that give you a quick idea of the overall performance of your campaigns over a given period.
Campaigns: This section lets you delve into the details of each individual campaign. You can view specific statistics, such as open rates, click-through rates, and other important metrics to assess the effectiveness of your campaigns.
Users: If you work in a team, this section lets you see the performance of each team member, helping you to identify strengths and areas for improvement.
Channels: Here you can analyze the performance of different communication channels you use, such as email or LinkedIn, to see which generates the best results.
Analysis overview: This section provides an overview of analyses and reports, enabling you to quickly understand trends and patterns in your campaigns’ performance.
d) Templates
To create a real user manual for your sales or recruitment teams, you can prepare a multitude of time-saving templates.
- Email: The email template is fairly standard, so you don’t have to keep copying and pasting.
- Programming: This is a little less common, so let me explain. If you market a product or service in a time zone other than your own, it can be a good idea to shift your campaigns using calendars. So your campaigns can work even when you’re asleep. What’s more, this can be very useful if you know your target audience well, and know that they are more receptive between 6 and 9 a.m. and between 5 and 8 p.m., as is often the case with craftsmen.
- Images :I’m going to spend a little more time here. This feature has long been Lemlist’s number-one selling point. Lemlist has made a name for itself thanks to hyper-personalization. You can personalize an image in the same way as you personalize a message. Instead of having a variable of type ((firstname)), you’ll have a variable ((media)).
This is an extremely powerful trick, whether you’re prospecting talent or companies, because you can add your prospect’s photo, their company logo, or even a screenshot of their landing page.
Here’s a concrete example:
- First name: Tristan
- Company: Mirrorprofiles
- Media link
No problem with the media link—Lemlist automatically retrieves it if you obtain LinkedIn information via their platform.
On Lemlist, once you’ve created your template, you’ll see the results straight away.

Then, once this template is integrated into your prospecting campaign where Tristan from MirrorProfiles is located, he will receive this image from Frédéric from Stepward :

Cool, isn’t it? 😀 The big advantage is that you’re sure to arouse your prospect’s curiosity, and he’ll read your e-mail. here, for example, it was for recruitment purposes 😉
Next, a word of advice: if you don’t have a specific idea for an image, don’t force yourself to create one just to have one.
e) Unsubscribe
The “Unsubscribe” tab in Lemlist plays a crucial role in managing unsubscribes, ensuring that your contacts’ communication preferences are respected. Here’s an overview of the different sections and functions available:
- E-mails or domains: Here you can enter e-mail addresses or domains for which you no longer wish to send e-mails. This is a key element in preserving your reputation as a sender and complying with privacy legislation.
- Example: lead@example.com or @example.com: This example illustrates how to format e-mail addresses or domains to be added to your unsubscribe list.
- Only domains / Exact match: These options let you choose between blocking all e-mails from a specific domain or blocking a specific e-mail address.
By using Lemlist’s “Unsubscribe” tab, you can manage unsubscribes efficiently, ensuring that your contacts’ communication preferences are respected, while preserving your reputation as a sender and avoiding the penalties associated with non-compliance with privacy regulations.
f) Tasks
The “Tasks” tab in Lemlist is designed to help you organize and track all the tasks and activities related to your prospecting campaigns. Here are the different sections and functions available to you:
- Required: This section groups together all tasks requiring your immediate attention. This can include follow-ups with prospects, replies to e-mails, or any other planned action.
- Coming soon: Here you can view the tasks planned for the coming days or weeks, helping you to organize your schedule and make sure you don’t forget anything.
- Task search: This feature lets you quickly find specific tasks using the user name, first name or other keywords associated with the task.
By using Lemlist’s “Tasks” tab, you can stay organized, track your activities and make sure you don’t miss any important opportunities. It’s an indispensable tool for managing your time efficiently and optimizing the performance of your prospecting campaigns.
Now that we’ve explored Lemlist in detail, I’ll take you step by step through the process of launching your first Lemlist campaign.
a) Build your cross-channel or multi-channel prospecting sequence
A good campaign should include at least 7 steps. Prefer multiple relays to 2/3 messages exceeding 600 words. Each reminder must be carefully thought out to provide your prospect with even more value.
The principle of an automated campaign is that it stops when the prospect responds. The great thing about Lemlist is that we can integrate manual steps without breaking the whole sequencing.
Let’s analyze this small example:
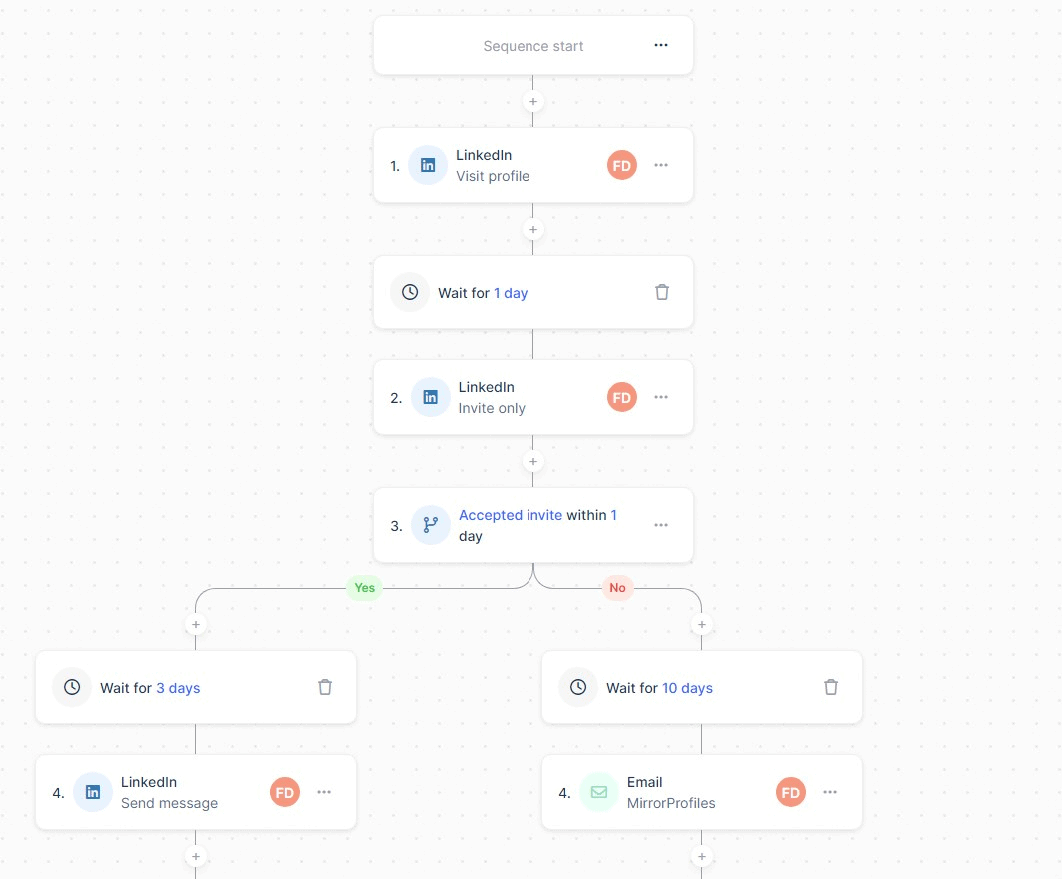
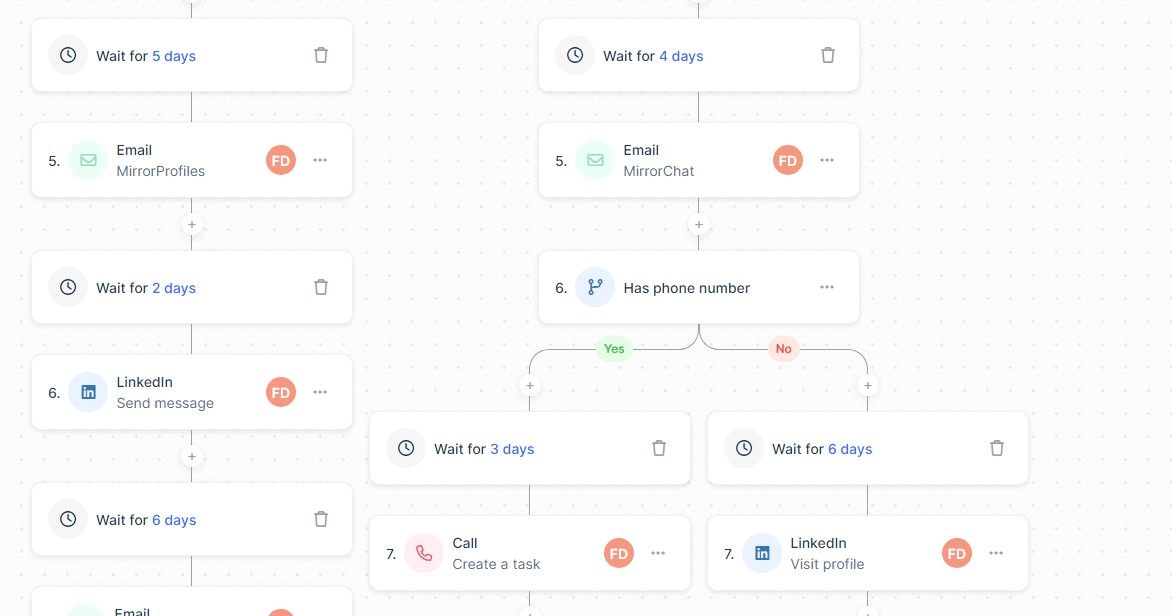
Here we have a complete overview of everything Lemlist has to offer in a single sequence:
- LinkedIn: Interaction and engagement directly on the LinkedIn platform.
- Emailing: Send personalized, automated emails.
- Manual task: For example, making a call.
- API call: In simple terms, this feature lets you use a webhook to send your data elsewhere. In this case, all those who have not responded to these solicitations are returned to our Airtable.
In general terms, conditions (“If… Then”) enable you to adapt your reminders according to the data you have, but also according to your prospect’s previous action. Lemlist provides you with all the tools you need to run a successful lead-generating prospecting campaign. If you need help, Stepward, a specialized growth agency, is a partner of Lemlist and MirrorProfiles. They can help you build your sequences.
b) Multiple shipper
You choose which mailbox or LinkedIn account to send the message from. Here, you can vary the pleasures! Don’t hesitate to use 2 or 3 different “senders”, especially for a long sequence with many reminders.
Why? Prospects will feel valued to see that several people are interested in them and their company. If you’re running prospecting campaigns, the tagline:“XXX, development manager, has tried to contact you” works very well, especially when the reminder is sent by someone with a higher hierarchical level, for example, “Development Director”.
What if you don’t have enough colleagues in charge of prospecting, or if they simply don’t want to lend their LinkedIn account or email address? The answer is simple: MirrorProfiles.
With our tool, you can multiply the “senders” as you wish. In addition to increasing your prospecting capacity, you can build an entire brand universe around your colleague. For example, we use our MirrorProfiles accounts with Lemlist, personalizing them as “Head of Growth”, then “Marketing Director” and finally “CMO”. The idea is to create a peer-to-peer relationship. A person is more inclined to respond if the other person is hierarchically superior or has more experience. Here’s a guide to help you optimize the branding of your LinkedIn profiles, it’s a gift! 😉
c) Import Leads
Data is essential! Lemlist offers different ways of importing databases into its tool.
- From LinkedIn: Preferably in conjunction with LinkedIn Sales Navigator, you can download the Lemlist extension to import the leads in your LinkedIn search directly into Lemlist. As mentioned above, Lemlist will then offer to enrich your prospecting file with professional e-mail addresses.
- From a CSV file: Although LinkedIn accounts for a large proportion of our databases, you can also import your own.
d) Review and Launch
There’s nothing complicated here, and you can check and adjust your settings before launching your campaign.
I haven’t touched on the subject of copywriting because there are no more subtleties than that when it comes to the technique behind the tool. Nonetheless, message content is crucial to good performance. We’ll be publishing an article on this subject in the near future, but in the meantime here are some message templates.
To analyze the performance of your Lemlist campaigns, go to the “Reports” tab.
a) Overview / Campaigns
Personally, I don’t use this tab much, as it offers a macro view of all the campaigns combined, which can be a little confusing. That’s why I prefer to go directly to “Campaigns” where you’ll have access to all your KPIs campaign by campaign.
Don’t overlook the “positive” and “negative” KPIs at the top right of your screen: “Thumbs up” = Positive KPI and “Thumbs down” = Negative KPI.
Negative” KPIs with the “thumbs down” are essential for managing your data. This is where you’ll find unsuccessful emails and unsubscribes.
If more than 5% of your database is in the “Bounced” category, it’s advisable to stop the campaign and switch your database to an email verifier like Emailable or Neverbounce.
b) KPIs or Key Indicators
Returning to the “positive” KPIs, you will find these key indicators:

If your open rate is below 40%, you need to review your email subject lines. Keep these four essential rules in mind:
- Use between 2 and 5 words.
- Avoid emoticons.
- Try to give the impression that the email is internal to the company. For example, use objects such as “Recruitment” or “Prospecting”.
- Test constantly. Your business and your customers are unique, and some items will work better than others. It’s crucial never to stop testing.
If your click-through rate is below 10%, you need to rework your “Call to Action”. Avoid hyperlinks, as people are becoming increasingly suspicious. It’s not so much the link itself that’s the problem, but rather the way you get your prospect to click on it.
If your email response rate is below 5%, it’s time to rework your copywriting and the objective of your message. That would deserve an article of its own, but here are five basic rules:
- Use your prospect’s lexical field, not your professional jargon.
- Keep your sentences short and simple.
- Do not exceed 400 words.
If your LinkedIn acceptance rate is below 50%, then it’s a good idea to read and follow the advice in this article.
If your response rate on LinkedIn is below 20%, as with emailing, you’ll need to rework your copywriting. You can draw inspiration from these prospecting message examples on LinkedIn. But here are five basic rules:
- Avoid marketing buzzwords, preferring simple, conversational language.
- Do not exceed 500 characters per message.
- Avoid polite end-of-message formulas such as “Yours truly” or “Have a nice day”.
- Use “I” rather than “we”.
- Phrase your sentences positively, rather than focusing on a problem.
c) Income generated
In the “Reports” tab, you can estimate the revenue generated by each campaign. This income is calculated according to your leads marked as “Interested”, your conversion rate and your average shopping basket.
To configure this :
- Click on the gear in the top right-hand corner.
- Fill in the “Average revenue per case” and “Conversion rate” fields.
Subsequently, each lead you mark as “Interested” in the “Tasks” tab will give you an idea of the potential revenue generated.
This is an approximate indicator that will have to be confirmed with sales representatives later on, but it gives you a good idea of whether or not the campaign is profitable.